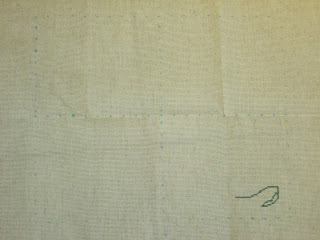
Tried a different kind of pin stitch this time... I like it better. It's MUCH less visible from the front, and it seems like it holds the thread just as well as the other, so I think I'm going to stick with this one unless I discover that it's not actually as secure as I thought.
Pretty sure I'm done with the darkest red on this section of robe. Not sure whether I'm going to stick with one colour at a time, or work from the bottom up now.
Thursday, 30 March 2017
Wednesday, 29 March 2017
Red Geisha - Day 10
All of the dark red up to the top of the gold section should now be done, just have the top 3rd or so to do to bring it up to her belt. Then on to the next colour!
Tuesday, 28 March 2017
Red Geisha - Day 9
More dark red... that one's going to take a while for this section; there's a lot of it. Well, all of the reds probably. It's hard to tell just how much of the other reds there are since the symbols have similar weights. The dark red was the easiest to pick out from the surrounding symbols, which was why I started with it.
Monday, 27 March 2017
Red Geisha - Day 8
I'm too lazy to take it out of the Q-snap until I have to move it, so you can't really see the entirety of what was completed today, but I finished off all the grass down at the bottom.
Tried out the pin stitch on the red sections and that one green stitch out in the middle of nowhere. I'm still not sure if I like it or not. I mean, I like the way it holds the threads, I'm just not sure if I like the look of it: you can see the difference in the stitches from the front, but hopefully they will be better hidden when there are stitches adjacent to help hide it. They'd probably look better on a smaller count or if I were using three strands instead of two... basically, if I had better coverage.
Tried out the pin stitch on the red sections and that one green stitch out in the middle of nowhere. I'm still not sure if I like it or not. I mean, I like the way it holds the threads, I'm just not sure if I like the look of it: you can see the difference in the stitches from the front, but hopefully they will be better hidden when there are stitches adjacent to help hide it. They'd probably look better on a smaller count or if I were using three strands instead of two... basically, if I had better coverage.
Sunday, 26 March 2017
Red Geisha - Day 7
Finished off the purple inside of the red robe, and did the turquoise border. I was planning on also finishing off the grass and a couple of the lower flowers on the right side, but it didn't turn out. Tomorrow, maybe.
Saturday, 25 March 2017
Red Geisha - Day 6
The gold under-robe worked up a LOT faster than I thought it would. I won't be putting in the metallic thread until the end either. I don't know what would happen to them when the Q-Snap is over top... I don't want them to snap or crack.
Thursday, 23 March 2017
Red Geisha - Day 5
I don't want to do the beads and ribbons on the bouquet until I've had a chance to wash and press it, and since I don't currently own an iron, we're back to the Red Geisha again! I'm working on the next section of robe now, the gold under-robe with the black circles (and metallic-thread diamonds, I discovered tonight to my chagrin... I was hoping it was only used for backstitching, but oh well).
Wednesday, 22 March 2017
Wedding Bouquet - Day 10
Stitching should now be complete (even the supporting threads for the spider web roses). Now I just have to wash out the guideline marks and flatten it a bit, and I can start on the beads and ribbons!
I'd accidentally done the heart between the names one stitch too low... I considered leaving it because I wasn't sure if I'd have enough pink for the flowers, but once I finished with the web lines, I went ahead and frogged it to redo it.
I'd accidentally done the heart between the names one stitch too low... I considered leaving it because I wasn't sure if I'd have enough pink for the flowers, but once I finished with the web lines, I went ahead and frogged it to redo it.
Sunday, 19 March 2017
Wedding Bouquet - Day 9
All the stitching done but for the last bit of back stitching (I think). The little bit of lace in this quadrant and the names... then I think wash and iron, and then the beads and ribbon after that, just in case.
Saturday, 18 March 2017
Wedding Bouquet - Day 8
Got distracted by video games, didn't get the quadrant quite finished. Oh well. Still got a good chunk finished.
Friday, 17 March 2017
Wedding Bouquet - Day 7
More leafy bits done today. Hoping to have this third quadrant done by tomorrow. There are a lot of large leaves, so it may take longer than the previous sections.
Thursday, 16 March 2017
Wedding Bouquet - Day 6
Tuesday, 14 March 2017
Wedding Bouquet - Day 5
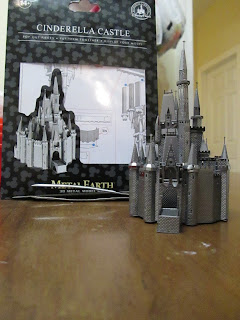
Just the one length of thread done today (doing the grey-green lace). I was working on this model for the last couple of nights:
So didn't have near as much time for stitching as usual. But that's done now and will be off to it's actual owner tomorrow.
So didn't have near as much time for stitching as usual. But that's done now and will be off to it's actual owner tomorrow.
Sunday, 12 March 2017
Wedding Bouquet - Day 4
Got all but one colour done in the second quarter (the green-grey for the lace). This is working up a whole lot faster than I thought it would. It's not unreasonable that I might be finishing it up next weekend.
Saturday, 11 March 2017
Wedding Bouquet - Day 3
First quadrant done (but for ribbons and beads of course). Without the flower petals, it kind of looks like I just decided to try out some random stitches on the cloth. The five blobs near the center are flower centers, and there will be a rose in the empty space between them.
I really liked doing the zigzag back stitching on the ribbon at the bottom. Too bad there's no more of that; it was fun.
I really liked doing the zigzag back stitching on the ribbon at the bottom. Too bad there's no more of that; it was fun.
Friday, 10 March 2017
Wedding Bouquet - Day 2
Coming together faster than I expected. I mean, I still have a bunch of back stitching to do on this section, but the cross stitching is moving along quickly (and from what I understand, the ribbons should take almost no time relative to the floss). I'm going to try to finish off each quarter as I go (but for the ribbons and beads), just so I don't have to keep taking it in and out of the frame.
Thursday, 9 March 2017
Wedding Bouquet - Day 1
Bad day turns less bad when there's mail. Doesn't look like much yet, but it's nice to have it started. This one has a due date, so it's moved right to the front of the queue as soon as it arrived.
Wednesday, 8 March 2017
Red Geisha - Day 4
Finished the green hem at the bottom of the gold robe, and added in a little bit more grass. Next time I should get some of the gold done of that section, so it'll start looking like something.
Tuesday, 7 March 2017
Red Geisha - Day 3
Left side of the robe is completely done (but for the beads and backstitching), and she has a foot now, peaking out from below the green hem.
Monday, 6 March 2017
Red Geisha - Day 2
Filled in the flower on the bottom, and started on her robe up the left side. The flower's kind of hard to see against the grass. I'm trying to be real careful on this one with my individual stitches so it's a little bit slower going than I'm used to, but I'm sure it'll be worth it in the end (plus since it's 14ct, I have to lay my stitches properly, lest a whole lot of white show through).
Sunday, 5 March 2017
Red Geisha - Day 1
Feels so nice to be back using DMC-like thread again. I believe Candamar uses Anton. It has a lot of friction when stitching, and horrible coverage (I'm getting better coverage with this thread, and it's on a 14ct vs Venetian Back Alley's 16ct).
Doesn't look like much yet after one day and one colour, obviously. You can kind of make out the flower silhouette at the bottom. My frame will only fit 3/4 of the width and 1/2 the height of the finished piece, so there's less done that it looks from this picture.
Doesn't look like much yet after one day and one colour, obviously. You can kind of make out the flower silhouette at the bottom. My frame will only fit 3/4 of the width and 1/2 the height of the finished piece, so there's less done that it looks from this picture.
Subscribe to:
Comments (Atom)


